Free Pattern: Butterfly Cocoon Capelet

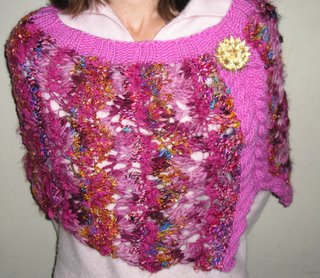
I finished my little capelet for myself and love it! I think that I NEEDED to stop all the Christmas scarf knitting and do something self-gratifying. It gives me incentive to get the Christmas knitting done so I can do some more creative work.
This piece was a joy to make:
Butterfly Cocoon Capelet
materials:
6 to 8 different yarns. textures, multi-colors, solids
(I used sari recycled silk, softee, manos de uraguay (or whatever it was called). , etc.)
1 skein brown sheep worsted weight in color of choice
size 15 needles and size 8 circular (length appropriate to your body. I used 24")
Using both size 15 needles, and long tail method, cast on 33 stitches.
Stitch Pattern:
row 1: k1, [k1, yo, k1, yo, k1, ssk, k2tog] repeat 3 times, end K4
row 2: and all even rows, p
row 3: repeat row 1
row 5: repeat row 1
row 7: k2, [ssk, k2 tog, k1, yo, k1, yo, k1] repeat 3 times, end k3
row 9: repeat row 7
row 11: repeat row 7
repeat rows 1-11 until piece measures circumference around body/arms @ chest.
(notes on stitch pattern: don't fret the pattern. just knit. Make sure that you always have 33 stitches on your needle at the end of your rows. Its easy to get off pattern because sometimes its difficult to see your stitches, especially when working with double yarn. I wanted a loose fabric without a definitive pattern. The holes are there so the color of whatever is worn under the capelet will come through as an additional color to the pallette. Work the yarns randomly. Only change yarns on one side so that all the loose ends can be worked in at the top of the capelet and hidden then under the shoulder band. I changed yarns onlly on odd numbered rows. Seek balance and not perfection in this process. It all works beautifully together when you add the cable and shoulder band.
cable:
with brown sheep and size 8 needles: cast on 18 (long tail method with both needles held together in one hand).
Row 1: p2, k6, p2, k6, p2
Row 2: k2, p6, k2, p6, k2
Row 3: p2, cable left 3 sts, p2, cable Right 3 sts
Row 4: k2, p6, k2, p6, k2
Row 5: p2, k6, p2, k6, p2
Row 6: k2, p6, k2, p6, k2
Repeat rows 1-6 until 4 to 5 inches shorter than length of capelet body piece. Now divide cable: Turn
p2, k5, k2tog, ssk, k5, p2
p6, k2 Turn
place remainging sts on separate holder
continue in cable pattern until same length as body.
Finish other cable:
k6, p2; turn; k2, p6 etc)
Starting at top (where all the new yarn joins are) of capelet body piece, seam each body piece selvage to cable, making body piece now into a tube (instead of flat piece).
Sew in all loose tails.
Along top of capelet, using size 8 circular needles, pick up stitches for shoulder band: approximately 2 per every row on body piece. The amount of sts picked up will vary according to how big the diameter of your capelet is. You do not want the sts to either pull or gather the body fabric. Knit one row around capelet. Next: work in a 3 x 3 rib (k3, p3) around garment for 1 1/2 to 2 inches. BO IN RIB PATTERN (Very important for stretch).
Let me know if you have any feedback on this pattern. I am attempting to write out my pieces (as oppossed to just knitting until it looks right) so that I can share my ideas. I welcome any feedback or questions so that I can refine my pattern writing skills. Thank you!!!!


2 Comments:
omg that is crazy beautiful! gorgeous work, it looks so touchable too. =D
This is gorgeous. I just bought some sari silk on a whim and couldn't figure out what to do with it. I completely heart this pattern.
Thanks!
Post a Comment
<< Home